Friday, June 30, 2023

Rose Lane Quilted

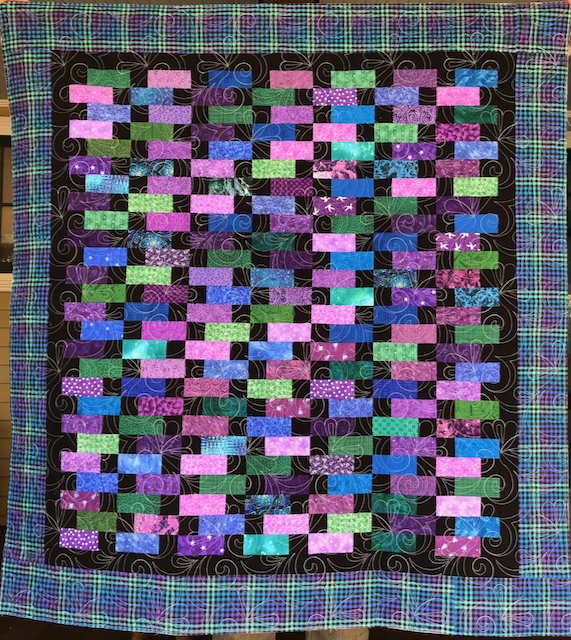
Just as June is coming to an end, I've managed to wrap up my One Monthly Goal! Taking inspiration from the floral theme and the original pattern name, I've decided to name this creation "Rose Lane". The pattern, Diamond Lane, was a free one from Wilmington. Although I made adjustments to the size of the blocks and the border, the final quilt still holds true to the spirit of the original pattern. This was my focus for June's One Monthly Goal.

I used a variety of rose and garden theme pantographs to quilt it. I'll go ahead and list them here for reference.

Donna Kleinke, One Song Needle Arts

Carmen's Roses Block
Carmen's Roses Border
Carmen's Roses Frame 2-Quarter
Carmen's Roses Motif (with an edit to add extra leaves)
Wind Dance Sash

Darlene Epp

Chloe's Garden Frame 5

Patricia Ritter

Rosebud Border (free right now)
Rosebud Border Corner (free right now)

The batting was the last bit of Hobbs Heirloom 80-20 batting. And I used Madeira Aeroquilt Red #8380 thread.

All in all, I'm thrilled to have reached my goal for the month, and I'm even more thrilled with the final outcome of Rose Lane. The floral patterns truly bring it to life, and I'm eager to start on my next project!

Linking up with:

Brag About Your Beauties
Finished Or Not Friday
Friday Foto Fun
Off the Wall Friday
One Monthly Goal Finish
Peacock Party
TGI Finished Friday


Sunday, June 18, 2023

Finished Customer Quilts!

I was excited this week when I received a batch of flimsies from a customer. Having practiced enough on my own quilts, I now feel pretty confident in executing edge-to-edge (E2E) pantographs on quilts made by others. I was thrilled to be commissioned to carry out E2E designs on four small quilts over the past week. (They all have Quilter's Dream Green batting.)

Scrappy lap quilt
Quilted with Diana pantograph
Red currant Maxi-Lock thread
Scrappy Blues and Tan Lap quilt
Quilted with Adrienne pantograph
Tan Variegated Madeira Aeroquilt thread
Adorable Halloween panel
Steel grey Maxi-Lock thread
Pioneer Panel throw quilt
Green variegated Madeira Aeroquilt thread

This was a fun project. I'm eager to keep honing my skills and bringing other people's creative visions to life!


Saturday, June 17, 2023

June Friday Night Sew-In

My initial plan was to piece together my Diamond Lane quilt during Friday Night Sew-In (FNSI), but an unexpected appointment with a client offering me a commissioned quilting job came up.

Though, before ending the night, I managed to put together the horizontal strips. I'm eager to finish the assembly over the weekend, although I will give priority to the paid quilting gig.

What's more, I'm genuinely thrilled about this lady who has begun giving me her small quilts to work on. I completed three for her this week, and she has just handed over another one. It's always exciting to have new opportunities and challenges to explore!


Monday, June 12, 2023

ToDo Tuesday #74

I did fairly well on my list from last week.

  • Draft the Cricut files for the sashing units.  ✔️
  • Cut out the needed pieces.  ✔️
  • Piece together the sashing units.  ✔️
  • Assemble the central quilt section.   ❌
After I spent all night binge sewing it together, I took the weekend off. Now that my husband works all week, I tend to take weekends off sewing now so I can spend more time with him. Most of my progress happens during the week.

This coming week I'd like to:
  • Assemble the central section.
  • Add the skinny borders.
  • Assemble the border pieces.
  • Quilt the customer quilt coming to me on Thursday!
Linking up with Tuesday ToDo.

Thursday, June 8, 2023

Cricut Convenience

Usually, when I'm cutting out quilt pieces with my Cricut , I gloss over that part in the blog. However, with this particular Diamond Lane pattern quilt, I found the process noteworthy, primarily because I think it actually improved the sashing block design. The original design had sashing comprised of multiple pieced squares, but I managed to consolidate them and then utilized my Cricut to carve out the shapes. The outcome? A more seamless and visually pleasing grey gingham strip!

I won't deny that turning the block design into an SVG (cut) file can be a bit challenging, but over time, I've found a method that works for me. (One can only hope that with the rising popularity of cutting machines, Electric Quilt might soon integrate a straightforward SVG file exporting option.) 

Once you have the block SVG file ready, you can upload it to the Cricut design software, and from there, it's quite easy to merge pieces and eliminate unnecessary seams. Often, I take the time to organize the pieces on the mat to avoid wasting fabric in between. This usually requires a bit of rotation to ensure the pieces nest nicely and attaching them so the Cricut machine respects my carefully planned arrangement. (I regret I forgot to take any photos of the uniquely-shaped pieces, though.)

Since getting the machine last year, I've been genuinely impressed with my Cricut's fabric-cutting performance. 

Initially, I was a bit apprehensive the consolidated shapes might complicate the assembly of the sashing blocks. But, to my delight, everything went smoothly. I just built the units progressively, leading to the final assembly. The sashing blocks were turning out so well last night that I couldn't resist pressing on until they were all sewn up, even if that meant crafting until the early hours of the morning!

Linking up with:


Monday, June 5, 2023

New Project Started

Since last week, I've made significant strides on my to-do list. The Cosmic Revival quilt? Quilted and done!

Creating a backing for the Comet's Revival quilt  ✔️

Quilting the Comet's Revival quilt ✔️

Make Quilt Labels for the finished quilts  ❌

Bind the Cosmic Cabin so it can be Mailed  ❌

Instead of tackling the binding of my pile of quilts, I felt an irresistible urge to embark on a fresh project from my UFO list. For June, my aim is to wrap up the flimsy for this Diamond Lane pattern from Wilmington Fabrics. For my take on it, I'm weaving in Farmhouse Chic florals along with a duo of complementary rose-colored prints.

Since finishing my quilt last Wednesday, I managed to piece together the corner blocks and the uncomplicated large blocks.

Now, it's time for a couple of dozen of these sashing pieces to take the stage.

So, for the week ahead, my game plan is:

  • Draft the Cricut files for the sashing units.
  • Cut out the needed pieces.
  • Piece together the sashing units.
  • Assemble the central quilt section. 

I'm ready to dive in and stitch up some progress!

Linking up with:

Design Wall Monday
Sew & Tell
Monday Musings
Tuesday ToDo


Sunday, June 4, 2023

2nd Qtr Sunday Stash 2023

Boy, did I have a thrilling escape this past weekend! I was on Hancock Paducah's website, filling up my online cart with delicious fabrics. I was so close to clicking that order button, but guess what? I triumphed and resisted! The secret weapon in my arsenal? A peek at my overflowing tubs of fabric. So far, this strategy has worked like a charm, though I'll admit, it's going to take all my strength to keep this up for the rest of the year. 

Whisking you back to April 2nd, my last fabric report had my net fabric use at 16¼ yards out. And hold onto your hats, folks, because I've been busy since then!

Including all the not-yet-sewn-on bindings, here's what's been happening in my craft room:

My Bordeaux Violette quilt got its matching pillowcases, snatching up 3 yards of fabric.

Sweet Louisa got a new dress, calling for 3¾ yards. (Got that figure straight from the pattern envelope, I was too caught up in the process to jot it down.)

Flower Paths is now finished, with 8 yards gracing the front side (a figure courteously provided by electric quilt), and 5 more yards decking out the backing and binding. 

And there's more: Midnight Mosaic demanded 2 yards for its backing and binding fabric.

Cosmic Cabin feasted on 3¾ yards for the front-side sashing and borders, and an extra 3 yards of extra-wide fabric for its backing plus ¾ yards for the binding. (To be frank, I'm still figuring out how to report extra-wide fabrics...)

And last but not least: Comet's Revival: 3¼ yards for the sashing and border, and another 4½ yards for the backing and binding. 

Phew! That's a whopping total of 37 yards since my last update. I can hardly believe it.

The grand total for the year? Drumroll, please... 87¼ yards used! Net, that means I've used 53¼ yards this year. I'm on cloud nine with this result! Let's keep this fabric party rolling!

Linking up with Sunday Stash

Saturday, June 3, 2023

Jun Friday Night w/Friends

My jump into the project experienced a bit of turbulence when I realized my original plan would result in a whopping 99" square quilt! With my 10-foot long arm frame, that size is nothing short of a hassle – imagine wrangling a bulky quilt onto the frame with the long arm in your way. Plus, I don't really have a need for another queen-size bed quilt. So, I decided to downsize.

I devoted 3 to 4 hours to tinkering with different options to trim it down: eliminating rows of blocks, reworking the border, you name it. None of them hit the mark. For a fleeting moment, I even considered changing the pattern entirely. Ultimately, I decided to simply reduce the block size from 6" to a more manageable 4.5".

Of course, this meant all the effort I'd put into devising a Cricut cutting plan had to be scrapped and reworked, leading to a bit more delay. But, after some adjustments, I finally started making headway.

Progress was slower than anticipated, but hey, at least it's a start!

Here's a snapshot of my chosen fabrics. The lighting isn't the best, but they look delightful. 

During my reshuffling of the plan, I reworked the colors. Originally, I had a rust tone in the mix, but it didn't gel with the rest of the fabrics upon a closer look. So, I brought in these rosy hues from my stash, which harmonize perfectly.

Usually, I wouldn't cut out squares with my Cricut, but with the resized blocks, some squares landed at rather awkward dimensions.

Here's the fruit of last night's labor. I'm eager to carry on with the project today. My goal is to complete these checkerboard squares and the nine patches. Then, come next week, I can dive into the sashing and border units.

Thursday, June 1, 2023

June One Monthly Goal

According to my Quilt Guild, this month is supposed to be finishing my Aged Elegance bonus crib quilt. But guess what? I've got that one in the bag already – I finished it back in February. So, I've got the freedom to dive into whatever project my heart desires.

Sure, there's the Easy Street quilt that I prepped a couple of months ago. But, I ran into a little hiccup; it turns out, I made the blocks larger than the original pattern. Now, I'm in a bit of a pickle – do I go ahead with the supersized blocks, or do I take the extra step to trim them down to the size that Bonnie Hunter had in mind?

Instead of dwelling on that conundrum, I've decided to shift gears and dive into my Diamond Lane quilt using the Farmhouse Chic fabrics. These were an impromptu pandemic clearance fabric binge, and it feels good to finally put them to use.

Today, I've been knee-deep in creating the Cricut fabric-cutting files. Cutting out triangles isn't my favorite pastime, and this quilt demands plenty of them. But come tomorrow, during our Friday Night With Friends, I'm aiming to kick off the cutting stage.

So, what's my game plan for the month? My sights are set on finishing the quilt flimsy. Quilting it completely would be a bonus, but I'll be perfectly content if I manage to put the finishing touch on the flimsy.

Linking up with One Monthly Goal.